
How to Set Up a Front End Development Project
- Piotr Gago

- Apr 19, 2022
- 6 min read
Updated: Sep 2, 2022
Generic setup for React + TS projects (VS Code) step by step
When we start a #new project, it's good to set up a few things before diving into the #code. In this article, I would like to present the setup of two libraries that can be useful in any front-end project. Furthermore, the illustrated #configuration allows us to keep the code clean and can help us learn about good practices within the #React framework.
ESLint

Eslint is an open-source JavaScript tool developed in 2013 by Nickolas C. Zakas. Eslint allows us to use code-linting to find bugs in our code. For this purpose, it uses static code analysis to find the most common errors or code that does not comply with "good practices."
Eslint can be extended with additional parsers and sets of good practices, depending on the libraries we are interested in (eg, Vue, React, etc.). Eslint is also an excellent tool for learning about good practices by reviewing the bugs it reports. In the documentation, we usually find why Eslint treats a given piece of code as inconsistent with the good practices.
Prettier

Prettier is related purely to code style, and it is a great tool to keep the consistent code style within our whole application. Prettier does not affect in any way the logic of our program. However, we have to be careful when configuring prettier with Eslint. There are specific overlapping rules between those two tools – so we will have to be careful and set them up in sync with each other.
Let’s jump to the code!
In this example we will use Visual Studio Code. Some of the comments presented will be specific to this IDE. Of course, the eslint / prettier libraries themselves are completely independent of the chosen IDE.
Step 1 – Visual Studio Code
In this example I am using Visual Studio Code. Before we will start I recommend installing the Eslint and prettier plugin on the level of our IDE.
Click Extensions -> Search for Eslint and prettier. Then install both of them.
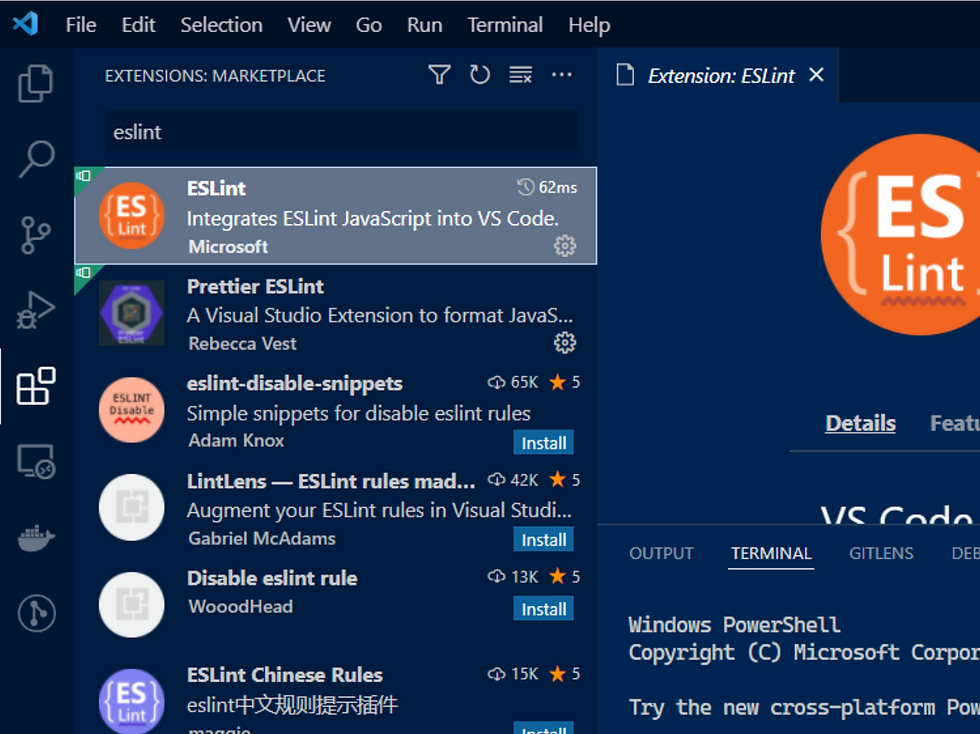
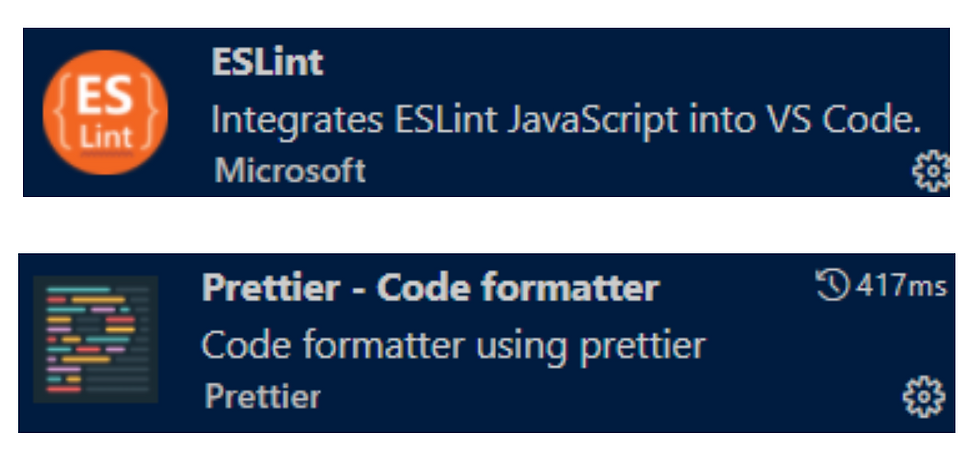
This should make the integration between Eslint and prettier with VS code much more smooth.
Step 2 – creating new React app
We'll start by creating a new React app project using a CRA (create-react-app) with a TypeScript template TypeScript.
npx create-react-app sample-app --template typescriptStep 3 – adding Eslint to our dev dependencies
Now let’s add Eslint to our project as dev dependency
npm install --save-dev eslintStep 4 – initial Eslint setup
Now let’s generate the initial configuration for Eslint. For that we will use the following command:
npx eslint -initThe above command will guide us through the process of automatic configuration of our project.
1. First, we want to choose exactly what we are expecting Eslint to do. Choose the last option. We want Eslint to check syntax, find problems and enforce code style (although for that, we will also use Prettier).

2. Next, we decide what type of modules we use within our code. In our case, we are working with React – so we are using built int JS modules. If you are working with Node.js – you may need to choose CommonJS.

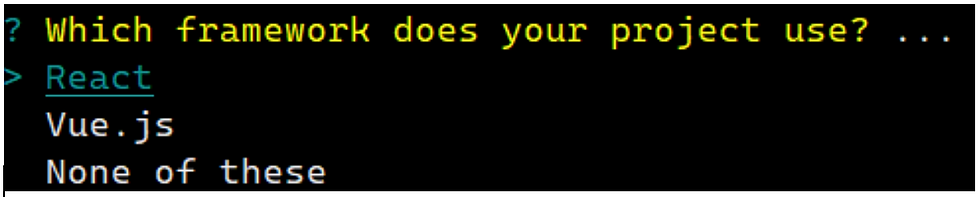
3. Then we can choose the framework we are working with. Here we choose React. If you are using a different framework that does not appear on the list, you will have to manually set up Eslint later.
4. Then we choose whether we are using TS.

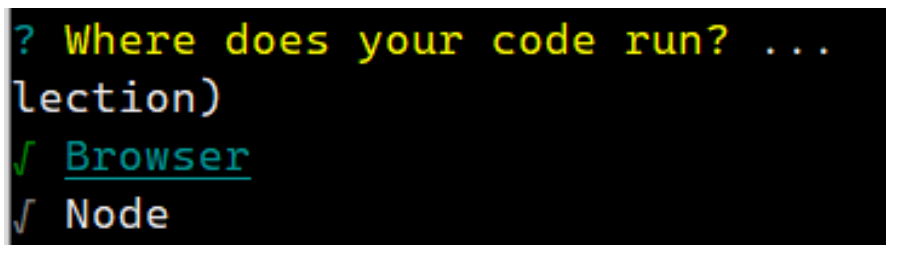
5. Then we choose the environment for our code to run. In our case, it's the browser.
6. Then we can choose the initial settings for the Eslint. Finally, we can select one of the predefined style guides created by Google or Airbnb or set up an initial config based on a questionnaire. In my case, I want to generate my own settings by answering a few questions about my code style.

7. Here we can choose the format of the configuration file. I want to use JS.

8. Then we can choose the style of indention. I will use spaces.

9. And whether we want to use single or double quotes for strings. I want to use double.

10. Then I define the line endings. I will use the Unix style.

11. And the last question. I generally like to have semicolons in my code.

Eslint will propose to install the necessary libraries based on our previous choices. Choose yes.

The libraries we will install are as follows:
eslint-plugin-react@latest – this package contains linting rules specific for React
@typescript-eslint/eslint-plugin@latest – this one contains linting rules for TypeScript codebases
@typescript-eslint/parser@latest - ESLint parser which leverages TypeScript ESTree to allow for ESLint to lint TypeScript source code.
Next we will install prettier and additional library for combining Eslint with prettier. After that we will deal with specific configuration.
Step 5 – prettier and eslint-plugin-prettier
Run the following command:

Step 6 – configuring Eslint and Prettier
Now we will modify the .eslintrc.js. Below you can find the full configuration. Remember that we assume that you have install all the packages mentioned above.

Then let’s take a look at a few things here.

The root setting allows us to choose which eslint settings are used. This is useful in situations when structure of our code is more nested. We can have subprojects with different eslint settings. Here you can read a bit more about it:
The env sections allows us to specify in which environments our script is designed to run in. Each environment brings with it a certain set of predefined global variables.
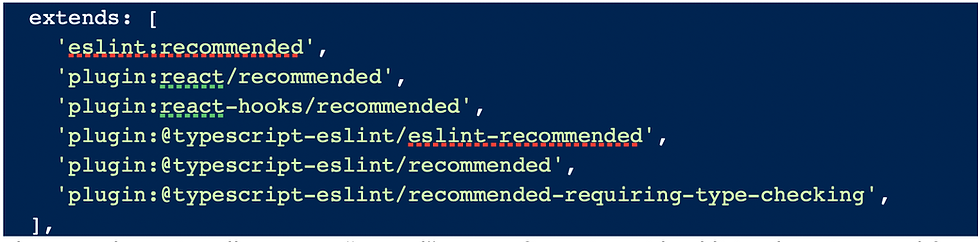
The extends section allows us to “extend” our configuration with additional settings read from another package. This works in a recursive way. Here we are using all our additional libraries installed in the previous steps.

The plugins section allows us to use third-party plugins. We can omit here the prefix “eslint-plugin”. Here we are also plugging prettier into eslint. The formatting problems detected by eslint will be displayed by eslint as errors/warnings. Depending on our configuration.
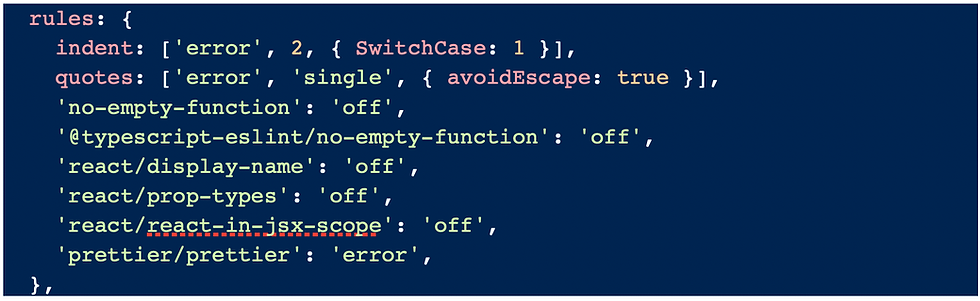
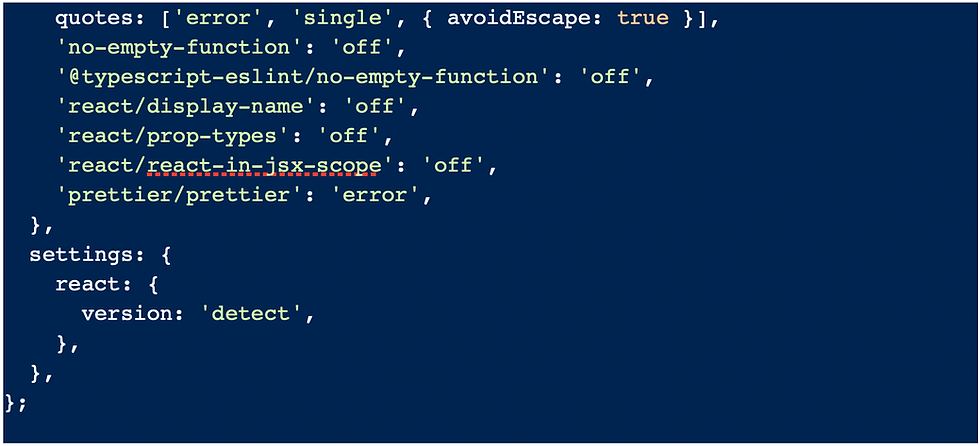
The rules section allows us to overwrite and change certain default linting rules. We can decide what should be treated as warning or error. We also treating prettier messages as errors in the last line. This section you can later use to tweak the eslint configuration for your project.
Step 7 - configuring .prettierrc.js
The above configuration is mostly related to eslint. Now let’s add to the root of our project file called .prettierrc.js
Then add to this file following configuration:

In this file we can exactly specify our codestyle. Remember that certain settings in this file should be in-sync with eslint. For ex. singleQuote – we assume that eslint is also set to singleQutes. Otherwise we can have strange issues related to eslint/prettier.
Step 8 - ignoring files
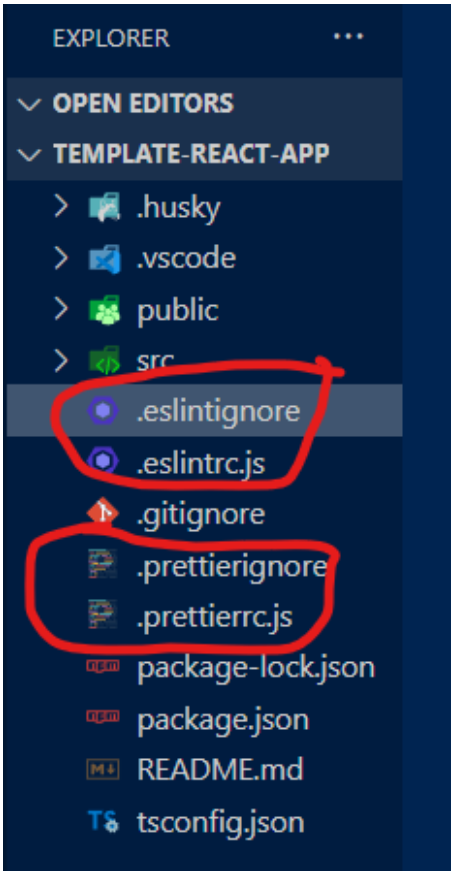
We can also add two useful files to the root of our project
.prettierignore – in this file we can decide which files should be ignored by prettier. We can copy the content of .gitignore and paste it in here.
.eslintignore – here we can put all the files that should be ignored by eslint
Our project structure should currently looks as follows:
Step 9 - adding custom scripts
Now let’s open package.json and add a few additional scripts.
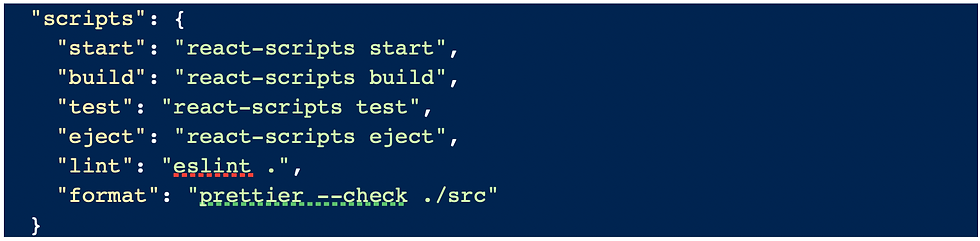
We added “lint” and “format” script. First one uses eslint on our whole project. Second one uses prettier to display all the formatting problems found in src directory.
Step 10 - testing
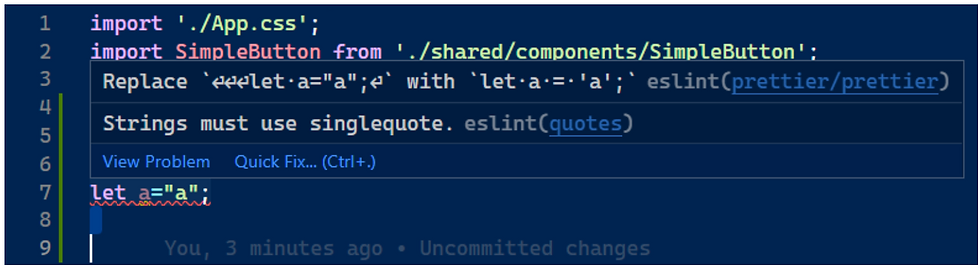
Now let’s open App.tsx and make a small change

We added let variable and a few unnecessary spaces. Now let’s see whether eslint and prettier will detect certain problems with our code.
First let’s run
npm run lint
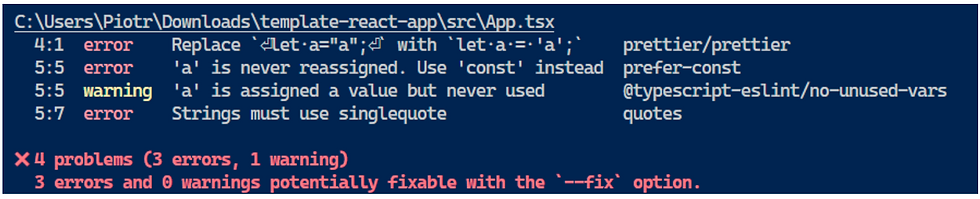
As we see eslint is giving us a brief list of problems including errors detected by prettier.
Now, let’s run
npm run format

We have a warning detected by prettier. Of course this warning was included as error in eslint thanks to our eslint-prettier-plugin.
Step 11 - fixing errors
We can try to auto-correct detected errors. We can do it using the command line, or by hover over in VS Code over the problematic code. There we should see option called “Quick Fix”.
Then we can choose “Fix all auto-fixable problems”.
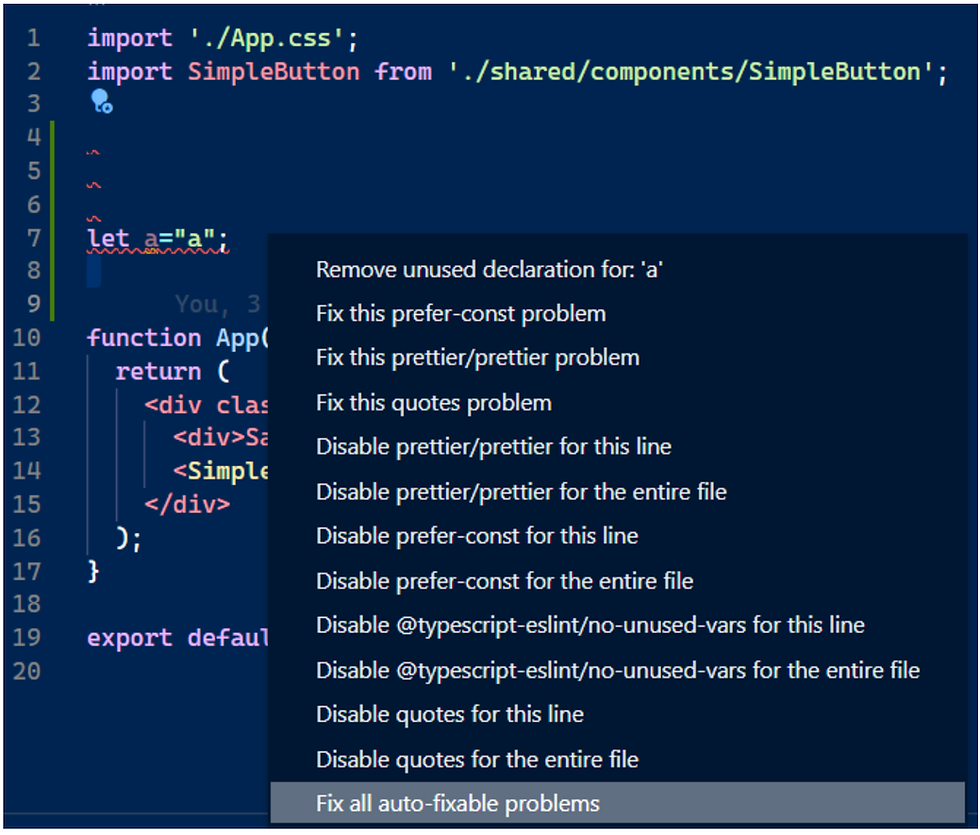
This way we will automatically fix all the errors detected by eslint and prettier (if that’s possible). After this action our code looks as follows. Notice that let was translated into const – according to good practices.

Great! It would be nice to not have to do it manually all the time. In the last step we will try to setup “Fix all auto-fixable problems” to be executed on save.
Step 12 - VS Code optimization
The final small tweak to do is to simply run eslint and prettier on save. This way we won’t have to worry about manually running those commands.
Open .vscode/settings.json and paste following code:
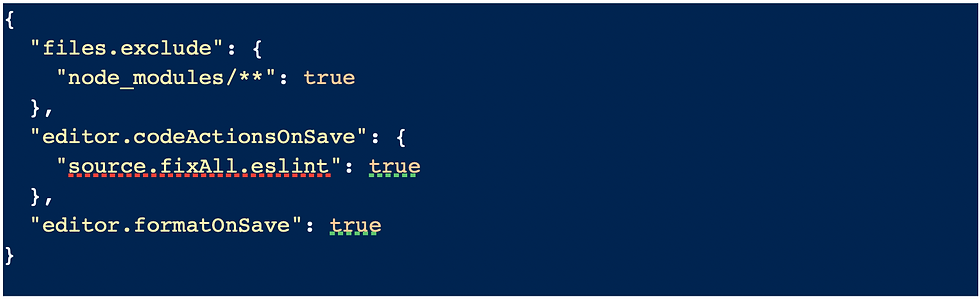
Save it. Now get back to App.tsx and try to add some changes and save the file. VS Code should reformat and fix all the detected problems automatically.
Great!
Hopefully this will allow you to speed up your development! : )
Comments